Showing posts with label prepared statement. Show all posts

Sunday, August 4, 2013

Internationalization(i18n) and Localization(L10N)

Internationalization(i18n):-The process of preparing an application to support more than one language and to represent data in different formats.There are 18 letters between i and n so will refer as i18n

Localization(L10N): -The process of adapting an internationalized application to support a specific region or locale
Lets take an example of Facebook which supports multiple languages like Engilish,Portugal,Hindi etc.
This can be achieved in JSF by using resource bundle.

Steps to Internationalization :-
  • Create a JSF web application in Eclipse
    • Open work space
    • Then New-->Create dynamic web application
    • Select run time environment like Tomcat etc.
    • Place JSF related libraries/Jars into build path(Ex:- ApacheMyFaces.lib etc.)
  • Create a resource bundle :- generally they will be .properties files,where we write text for different languages
  • Loading resource bundle :- There are two ways of implementing
    • faces-config.xml :- use <resource-bundle> is used to i18n for entire application
    • <f:loadBundle> :- is used to i18n for a particule web page

We will now implement i18n and L10N in a web application. We have a login page which supports English and French languages.Text related to this are placed in .properties file
  1. Create two .properties file one for English and One for French languages.Place them under src folder
    ApplicationResource.properties
    LoginId: Login Id:
    Password: Password:
    Login: Login
    Reset: Reset
ApplicationResource_fr.properties
LoginId: Identification d'ouverture :
Password: Mot de passe :
Login: Ouverture
Reset: Remettre à l'état initial
  1. Now we will use this resources in faces-config.xml .We can do this from GUI of faces-config.xml

<application>
<resource-bundle>
<base-name>ApplicationResource</base-name>
<var>msg</var>
</resource-bundle>
<locale-config>
<default-locale>en</default-locale>
<supported-locale>fr_FR</supported-locale>
</locale-config>
</application>
  1. Create a ManagedBean-LoginBean.java and register it in faces-config.xml . We can do this from GUI of faces-config.xml
    LoginBean.java
import java.util.Locale;
import javax.faces.context.FacesContext;

public class LoginBean {
private String uName;
private String password;

public String getuName() {
return uName;
}

public void setuName(String uName) {
this.uName = uName;
}

public String getPassword() {
return password;
}

public void setPassword(String password) {
this.password = password;
}
public String changeFrench()
{
FacesContext.getCurrentInstance().getViewRoot().setLocale(Locale.FRENCH);
return "";
}
}

Explanation :-
In LoginBean.java we have a method changeFrench() which will take care of getting text from properties file and converting it into respective language
FacesContext.getCurrentInstance().getViewRoot().setLocale(Locale.FRENCH);
The above statement is used change language to French
  1. Login.jsp

<f:view>
<h:form>
<h:outputText value="#{msg.LoginId}">
</h:outputText>
<h:inputText value="#{loginBean.uName }"></h:inputText>
<br>
<h:outputText value="#{msg.Password}"></h:outputText>
<h:inputText value="#{loginBean.password }"></h:inputText>
<br>
<h:commandButton value="#{msg.Login}"></h:commandButton>
<h:commandButton value="#{msg.Reset}"></h:commandButton>
<h:commandLink action="#{loginBean.changeFrench }">
<h:outputText value="French"></h:outputText>
</h:commandLink>
</h:form>
</f:view>

Here we have used #{msg.LoginId} etc. statements. The variable msg is declared in faces-config.xml .
Now run the application .By default the page will be in english for converting into French click on link French.
Screenshot of Login.jsp in English :-

Click on French the method changeFrench in LoginBean will get called and converts the text into French


If we want to do it for a specific jsp page we can use
<f:loadBundle var="msg" basename="ApplicationResource"/> after <f:view> tag
Happy Learning

Please provide your valuable comments on this article and share it across your network.


Saturday, July 27, 2013

Basic Annotations in Java Persistence API(JPA)

Hi,

Today we will discuss some of the basic JPA annotations.

Annotations :-
  • @Table
  • @Column
  • @Temporal
  • @Transient

Lets consider below table -Company

    SNO
  • NAME
    MAIL
    1
  • Google
  • google@gmail.com
    2
  • Yahoo
  • yahoo@yahoo.com
    3
  • Microsoft
  • microsoft@live.com

1.@Table :-is used to map your entity java bean with the table
In general your table name and entity bean will have same name at that time there is no need to use @Table
If the Entity bean is different from the table name we map it by using @Table annotation

Example :-
Lets take the above table-Company ,but my entity bean name is named as Organization  then we can use @Table to map them

@Entity
@Table(name="Company")
Public class Organization{.......}


2.@Column :- is used to map an instance variable with a column in a table
If the variable name and database column name is same ,then there is no need to use column
This is similar to @Table

Example :-
Lets take the data base column -Name in the above table
In Entity bean we have companyName.so how to map them?

@Column(name="Name")
Private String companyName;

3.@Temporal :-
  • In Java we have java.util.Date and java.util.Calendar classes,if we wnat to persist them into data base we should use @Temporal
  • Temporal are set of time based types
Example :-
@Temporal(TemporalType.DATE)
Date currentDate;

In Entity                                                                   Mapped to data base
  • TemporalType.DATE
  • Mapped to java.sql.Date
  • TemporalType.TIME
  • Mapped to java.sql.Time
  • TemporalType.TIMESTAMP
  • Mapped to java.sql.Timestamp

4.@Transient :-
  • Attributes that are part of Entity but should not be persisted should be marked as @Transient
  • Suppose we have a attribute lastName and should not be persisted to data base,we use@Transient
Example :-
@Transient
private String lastName;

There are many annotations in JPA,each one of them has special functionality which i will discuss in my later posts


Happy Learning

Please provide your valuable comments on this article and share it across your network.


Thursday, July 4, 2013

Introduction to Entity beans in Java Persistence API (JPA)

Hi All,

In this post we will discuss about Java Persistence API(JPA) entity bean.

Lets have a brief introduction about JPA.
JPA is a Java data base framework which eases interaction with database by providing following features
  1. Java Persistence Query language (JPQL)
  2. Object relational mapping
  3. Providing annotation etc.
The most important aspect in JPA is a Java bean class .
Bean in Java is a simple class with properties and their getter and setter methods

In JPA we call this bean with a special name called as Entity.

Entity Bean :- is an exact replica of a table in a database,it is independent of database used.
  • The mapping between a Entity Bean and data base table is configured in persistence.xml file
  • There are different types of annotations(@) which helps in representing primary keys,table name etc.
  • Annotation are in simple metadata(Data about Data),they give extra information to compiler
  • A normal Java bean can be converted into a Entity by using @Entity annotation
we will discuss more about annotations in upcoming posts.

In this post we will see how to write a Entity Bean

Environment used :-
  • Eclipse Juno
  • Oracle
  • JPA 2.0 jars
Lets have below COMPANY table in data base

    SNO
  • NAME
    MAIL
    1
  • Google
  • google@gmail.com
    2
  • Yahoo
  • yahoo@yahoo.com
    3
  • Microsoft
  • microsoft@live.com

Now we will write a Entity class for the same. In Eclipse its simple to create most of the required code will be auto generated.
  1. Switch to JPA perspective in Eclipse
  2. Configure data base connection by using Data Source Explorer view(window-->Show view-->Data Source Explorer)
  3. Create a JPA project(File—New-->Create JPA project)
  4. Open the project,in JPA content you will find persistence.xml file
  5. Now select the project click on new-->others--JPA Entity from tables
  6. Select the data base connection , schema configured in step 2 and select tables that you want to generate Entities
  7. Click the check box-- update in persistence.xml
  8. Select a primary key generator type like Auto etc(Not mandatory) continue and click finish
Lets see the code that gets generated for COMPANY table


@Entity
public class Company implements Serializable {
private static final long serialVersionUID = 1L;

@Id
private BigDecimal sno;
private String mail;
private String name;
public Company() {
}

public String getMail() {
return this.mail;
}

public void setMail(String mail) {
this.mail = mail;
}

public String getName() {
return this.name;
}

public void setName(String name) {
this.name = name;
}

public BigDecimal getSno() {
return this.sno;
}

public void setSno(BigDecimal sno) {
this.sno = sno;
}

}


Explanation :-

Here we need to take a look at two annotations

  1. @Entity :- Gives a identification for a normal Java bean as entity
  2. @Id :- Indicates the primary key in the table

Here we have three properties and their getter and setter methods,we will be accessing (setting/retrieving )the properties by using these methods.

There are lot more annotations available for various purposes will explain in details in my upcoming posts.

Now have a look at persistence.xml, we will find the Entity class added.

                         Happy Learning

Please provide your valuable comments on this article and share it across your network.


Sunday, June 30, 2013

Widening VS Auto Boxing during Overloading

Hi,

In this post we will see the usage of Over loading ,Boxing and widening concepts with an example.

Lets see how the above concepts are related with an example :

Example :-
public class WideningBoxing {
//Overloading example with boxing and widening
public void method(Integer x, Integer y)
{
System.out.println(" in Integer ");
}

public void method(float x, float y)
{
System.out.println("in float");
}
public static void main(String[] args) {
WideningBoxing wb=new WideningBoxing();
wb.method(1, 2);
}
}


Explanation :- Here we have two methods with same names,different parameter types.
We are calling this method from main .

Now the question is which method will be invoked when we call wb.method(1, 2);

The method with Integer or method with float parameters?


JVM will prefer to take widening than boxing here.
So the output will be
in float

The main reason behind this is widening was being implemented before auto boxing, so the API writers thought that the existing functionality should work same ,it should not be changed by adding new auto boxing feature.


This is the common Java interview Question


Note :- Widening is preferred than Boxing 

This is the key take away point from this post.

                     Happy Learning

Please provide your valuable comments on this article and share it across your network.


Thursday, June 20, 2013

Prepared Statement-Preventing SQL injections

Hi All,

Welcome to Java-recent.

In this post we will discuss about Prepared Statement-used to execute sql queries from Java.

Lets get into more details.

Prepared Statement :-
  • is an interface from java.sql.PreparedStatement
  • is used to execute queries,set values in a query
  • Prepared statement queries are precompiled and the fetch plan will be stored in cache,so for subsequent requests only execution will happen
  • They are faster than Statement queries because Statement queries will get compiled every time
  • Used in case there is repetetion of a query
  • Prepared statements can be parameterized,parameterization of query values is done by using '?' - place holder in setXXX() method
  • Prepared Statement prevents SQL injection
Syntax :-There are two ways of using prepared statement
1.PreparedStatement preparedStatement = connection.prepareStatement("select * from COMPANY where sid="+"'"+emailId+"'");

2. PreparedStatement preparedStatement = connection.prepareStatement("select * from COMPANY where sid=? AND name=?");
preparedStatement.setInt(1, 101);
preparedStatement.setString(2, "Google");

setXXX() -- takes two parameters first one tells position of the value to be placed,
this starts from 1 .
Second parameter is the respective value to be passed for ?-place holder

The first type of declaration will not prevent SQL injections because we are hardcoding the where clause with a variable.
Second type of declaration will prevent SQL inection because all the parameters passed will be escaped by JDBC

Example Code:- There is a webpage which takes user name as input and pass it into servlet
Servlet retrives emailId as per user name from DB

Design.java
@WebServlet("/Design")
public class Design extends HttpServlet {
private static final long serialVersionUID = 1L;

protected void doGet(HttpServletRequest request, HttpServletResponse response) throws ServletException, IOException {
String uName=request.getParameter("name");
Connection conn=null;
try {
Class.forName("oracle.jdbc.driver.OracleDriver");
//Creating connection object
conn=DriverManager.getConnection("jdbc:oracle:thin:@localhost:1521:xe","system","admin");
String query="select mail from COMPANY where name="+"'"+uName+"'";
PreparedStatement statement =conn.prepareStatement("select mail from COMPANY where name=?1");
statement.setString(1, uName);
System.out.println("query--------"+query);
ResultSet rs= statement.executeQuery(); //Executing query
//List ls=(List) rs;
//System.out.println(ls);
PrintWriter out=response.getWriter();
out.println("<head><body>");
while(rs.next())
{
String emailID= rs.getString("MAIL");
out.println("<h4>"+emailID+"</h4><br>");
}
out.println("</body></head>");
}catch (ClassNotFoundException e1) {
// TODO Auto-generated catch block
e1.printStackTrace();
}
catch (SQLException e) {
// TODO Auto-generated catch block
e.printStackTrace();
}
finally
{
try {
conn.close();
} catch (SQLException e) {
// TODO Auto-generated catch block
e.printStackTrace();
}
}
}
Submit.html
<form action="Design">
Enter name <input name="name"/><br/>
<input type="submit" value="click here to get details"/>

</form>


Here we have used place holder for passing values '?'
conn.prepareStatement("select mail from COMPANY where name=?1");
statement.setString(1, uName);
Case1 :- when we enter value as Google in the form and submit


we will get output as google@gmail.com

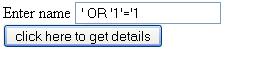
Case2 :- Now we will provide some special characters in the form as
' OR '1'='1


Now the resultset will be empty,because the statement ResultSet rs= PreparedStatement.executeQuery(); will remove the escape characters. So unlike in previous post SQLinjection it will not return entire results.


Happy Learning

Please provide your valuable comments on this article and share it across your network.


Like and Share